Audio Crew

Serving the Greater Moncton Area and All of New Brunswick

624 Salisbury Rd, Moncton, NB E1E 1B8, Canada 506-858-2739
  • Home
  • Services
    • Car Audio
    • Marine Audio
    • Motorcycle Audio
    • Remote Starters
    • UTV and Side-by-Side Upgrades
  • About Us
  • Location
  • Contact Us
  • Facebook
  • Instagram

Product Spotlight: Rockford Fosgate T1S-1X10 and T1S-1X12

T1S-1X10 T1S-1X12

Adding a subwoofer to your vehicle is the best way to upgrade the performance of any mobile audio system. The car audio fanatics at Rockford Fosgate have served up a pair of unique solutions for applications where space is at a premium. If you want a sub for behind the seat of a pickup truck or the cargo area of your hatchback or SUV, check out the Power Series T1S-1X10 and T1S-1X12 slim sealed enclosures.

Rockford Fosgate T1S-1X10 Features

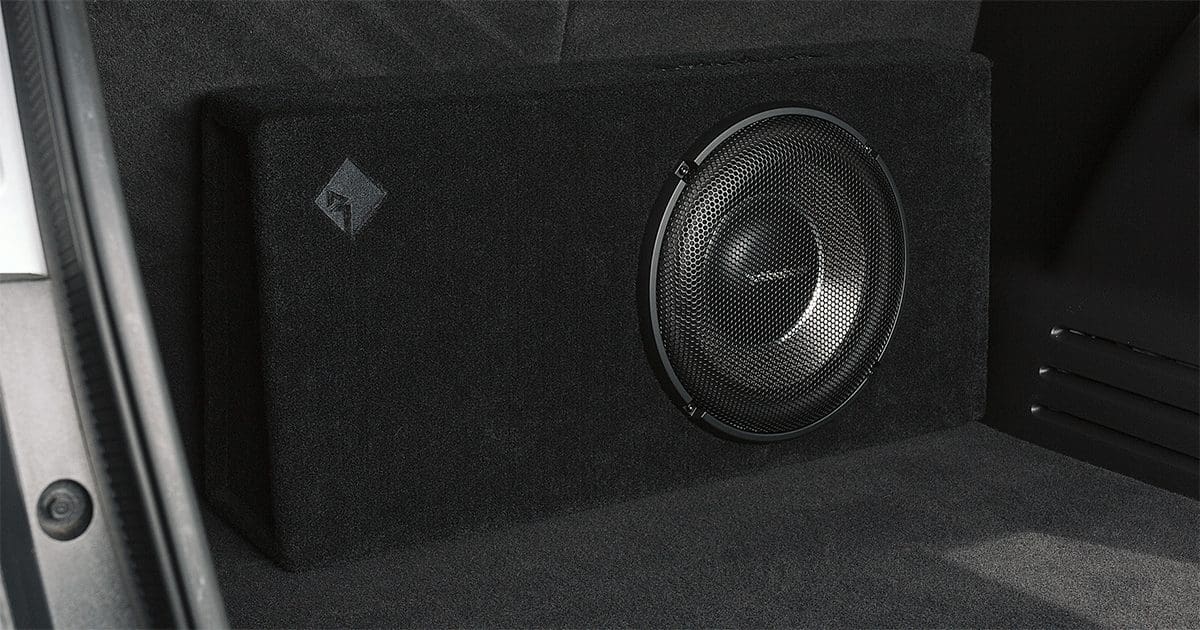
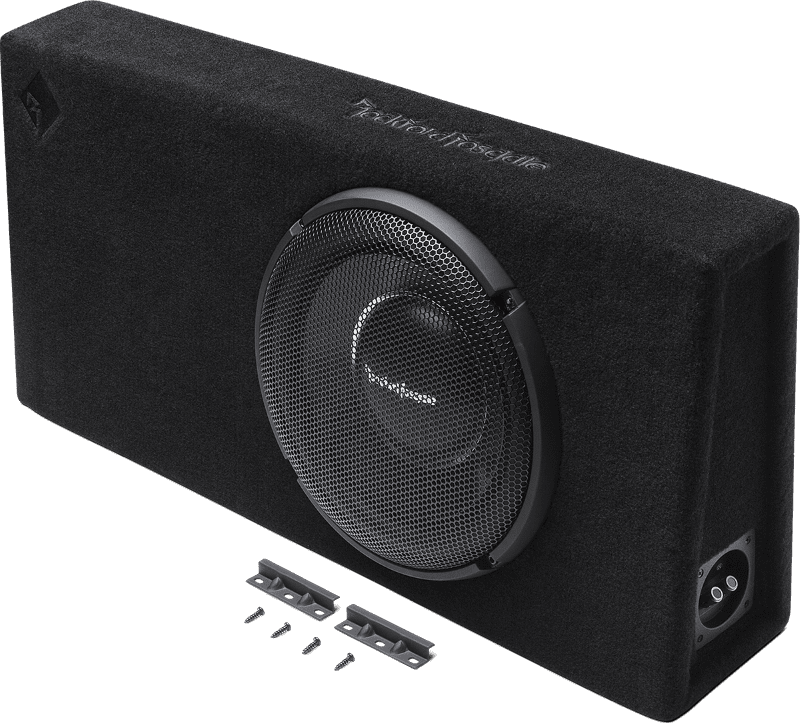
Let’s start by looking at the T1S-1X10 enclosure. This low-profile enclosure features a single 10-inch T1S1-10 slim-mount subwoofer. The enclosure measures 26.8 inches wide, stands 12.5 inches tall and is 6.3 inches deep at the bottom and 4.3 inches deep at the top.

The subwoofer is mounted on the angled face so the enclosure can fit against the back wall of a pickup truck while the driver follows the angle of the front seat. The enclosure is constructed from high-quality 5/8-inch MDF and weighs 30 pounds. The net internal air volume is 0.55 cubic foot.

A spring-loaded terminal cup on the right side makes it easy for your installer to connect to an amplifier. In addition, the terminal cup will accept up to 12 AWG wires for efficient power delivery – an essential consideration with low load impedances.

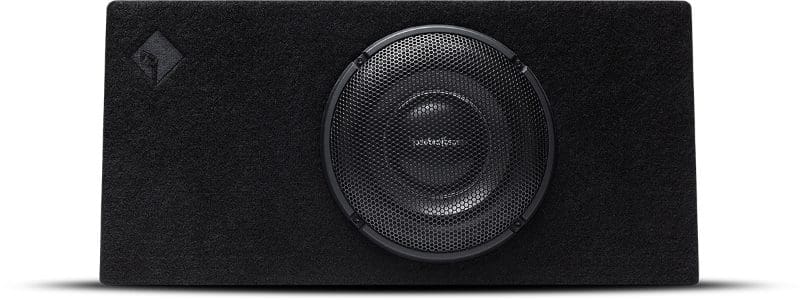
The enclosure is finished in a durable black carpet with the Rockford Fosgate logo embroidered into the top panel. In addition, the world-famous Diamond-R logo is embroidered in the top-left corner of the front. A heavy-duty grille is included to protect the subwoofer from damage. Speaking of preventing damage, Rockford Fosgate includes two hold-down brackets for the sides of the enclosure. Your installer can bolt these to the floor of your pickup to ensure that the subwoofer stays in place.

The T1S1-10 subwoofer in the system has a power handling rating of 500 watts continuous and 1,000 watts maximum. The driver’s nominal impedance is 1 ohm, so it will work perfectly with an amplifier like the Power Series T500-bdCP 500-watt monoblock.

T1S-1X10 T1S-1X12
A durable mesh grille protects the T1S1-10 subwoofer in the T1S-1X10 slim sealed enclosure.

Rockford Fosgate T1S-1X12 Features

If you have more room and want more output from your subwoofer system, then the T1S-1X12 enclosure is a better choice. This enclosure measures 31.5 inches wide and stands 14.5 inches tall. The depth at the base is 6.3 inches, and the depth at the top is 4.2 inches. The T1S-1X12 weighs in at 38 pounds. The driver is provided with 0.85 cubic foot of airspace to give a good balance of punch and low-frequency extension. The T1S-1X12 shares the same Rockford Fosgate and Diamond-R logo embroidery on the top and front panel as the T1S-1X10. Mounting brackets are also included with this larger enclosure to keep it safe and secure.

The T1S1-12 subwoofer used in the T1S-1X12 enclosure has a diameter of 12 inches and is rated to handle 600 watts of power continuously and 1,200 watts maximum. This subwoofer has a nominal 1-ohm impedance. The Power Series T500-bdCP amplifier is also a perfect match for this enclosure. If you want to save a few dollars, the Punch Series P500X1bd 500-watt monoblock is also a great choice.

T1S-1X10 T1S-1X12
Both of Rockford Fosgate’s Power Series slim sealed subwoofer enclosures include proper mounting hardware.

Serious Bass in a Small Space

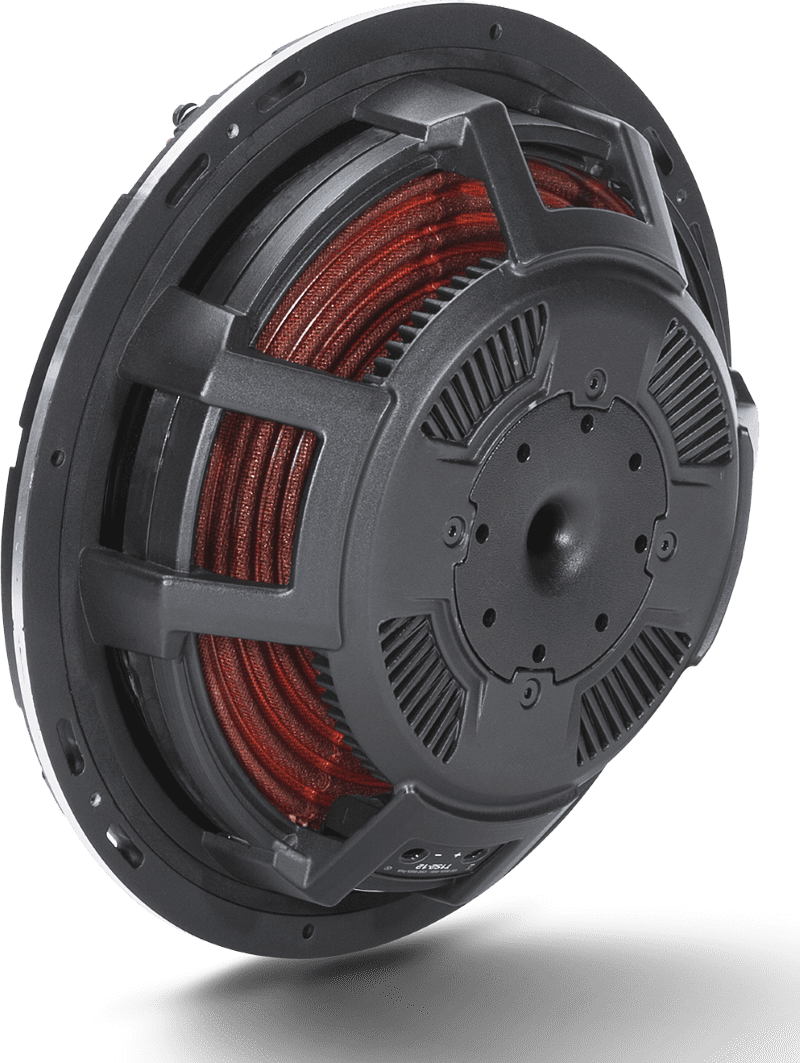
Make no mistake; these aren’t entry-level subwoofer solutions. Rockford Fosgate’s T1S1-10 and T1S1-12 subwoofers are serious engineering marvels. The drivers offer excursion capabilities that rival many full-depth subwoofers. In fact, Rockford Fosgate says these “slim” subwoofers offer nearly the same excursion capability as their full-size brothers, the T1D210 and T1D212. That’s a hard goal to achieve.

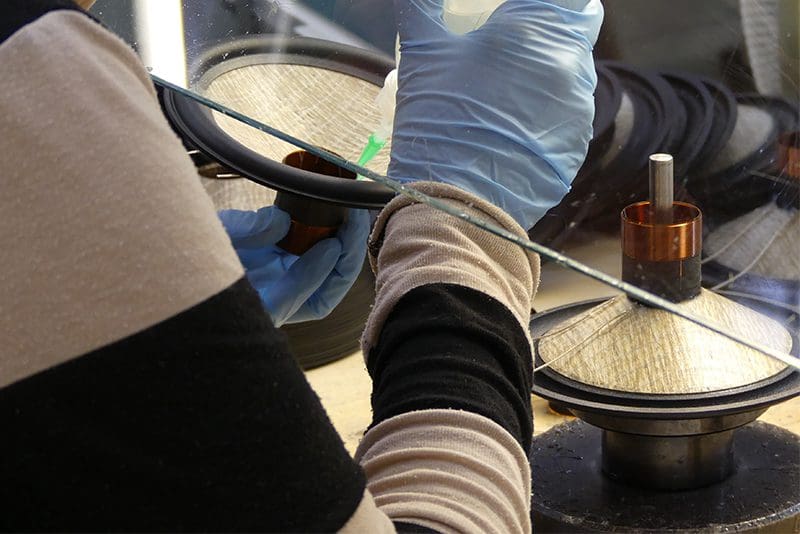
Also, unlike most shallow subwoofers on the market, Rockford Fosgate’s engineers have included distortion-reducing technology in their Integrated Copper Cap Heat Sinking Shorting Ring, which improves linearity and reduces distortion. The result is bass with impressive definition and clarity, especially at high power levels.

In addition, these drivers have been optimized with the Vertical Attach Surround Technique to increase the effective cone area and produce serious bass. You need to hear these subwoofers to believe them!

T1S-1X10 T1S-1X12
There’s an impressive amount of technology in Rockford Fosgate’s Power Series slim subwoofer solutions.

Upgrade Your Truck with Rockford Fosgate Power Series Slim Enclosures

If you have a truck that needs a high-performance subwoofer solution, then visit a local authorized Rockford Fosgate retailer and ask about the 10-inch T1S-1X10 and 12-inch T1S-1X12 slim subwoofer enclosure solutions. You can learn more about Rockford Fosgate amplifiers, speakers and subwoofers for your car, truck, boat, motorcycle or side-by-side by visiting their website. Follow Rockford Fosgate on Facebook and Instagram to learn about the latest products they’ve developed and events the team has attended. Finally, check out their YouTube channel to see some of the best videos in the car audio industry. We know you’ll be impressed!

This article is written and produced by the team at www.BestCarAudio.com. Reproduction or use of any kind is prohibited without the express written permission of 1sixty8 media.

  • Audio Crew

Filed Under: ARTICLES, Car Audio, PRODUCTS, RESOURCE LIBRARY Tagged With: Rockford Fosgate

Watts Are Watts, Or Are They? A Detailed Explanation for Car Audio Guys

WattsWhen people are looking at purchasing a car audio amplifier, the specification they check most often is how much power it can produce. Power is rated in watts – a universal unit of measurement of power. In this article, we explain what a watt is, and how it is measured – both the correct and incorrect way.

Dictionary Time!

WattsLet’s get the formal definition of a watt out of the way first. A watt is an SI (Systéme International) unit of the measurement of power. The power does not have to be electrical. In fact, the unit watt was named after James Watt and created to quantify the work a steam engine could do. In that kinetic application, a watt was the work done when the velocity of an object was moving steadily at 1 meter per second with a force of 1 newton opposing it. When referring to an electrical motor, 1 horsepower equals 746 watts.

As much fun as talking about horsepower is, we are car audio enthusiasts, so let’s get back on track with an explanation of the electrical watt.

In electrical terms, a watt is a transfer of 1 joule of energy over a period of 1 second. The next logical question is what is a joule? A joule is yet another SI unit of measurement, and it defines the amount of work required to move a charge of 1 coulomb through an electrical potential of 1 volt. Yes, the question now moves to the coulomb – what in the world is that? A coulomb is a unit of electrical charge – and is equal to -6.242 x 10^18 electrons.

Lost yet? Don’t fret; we are just appeasing the math and measurement nerds among us. Let’s break this down to what matters.

When we want to use electricity to do work, we have to flow electrons through a device like a filament, motor or voice coil. The result will be, in the case of a speaker, that the magnetic field created by the flow of electrons will cause the voice coil to be attracted to or repelled from the fixed magnet in our speaker. When we flow more electrons, more work is done, and the speaker moves farther toward or away from the magnet.

Power Math

Here is where we start to talk about power equations. There are three common methods of calculating the power in a circuit – but we need to know the values of other variables such as voltage, resistance or amperage. Any two of these variables can be used to calculate the power done in a circuit. Here are the equations:
WattsIf we have a circuit with a resistance of 4 ohms and we apply a voltage to it with a potential of 10 volts, then we have 25 watts of power. Increasing that voltage to 20 volts means the power available is now 100 watts. We can substitute and rearrange the variables in the equations above to figure out any other variable – it’s simple algebra.

Measuring Power

When a technician has an amplifier on a test bench and wants to measure power, the technician typically connects the amp to a bank of high-power load resistors, then measures the output of the amplifier when the signal has reached a distortion level of 1%. The measurement taken is voltage. Most often, we assume the load is not variable. Let’s say we measure 44 Volts RMS out of an amplifier and we have the amp connected to a 2 ohm load. That works out to 968 watts. It’s very simple and very repeatable – but it doesn’t work in the real world. Let’s look at why.

Resistance versus Reactance

This is going to get a bit technical. Audio signals are alternating current (AC) signals. AC signals are required to make the speaker cone move back and forth from its rest position, but they make power measurement much more complicated. The way conductors and loads react to AC signals is different from direct current (DC) signals.

Because AC signals change direction, the polarity of the magnetic fields they create also changes direction. Trying to change the polarity of magnetic fields wreaks havoc with the behavior of current flow. Once current gets flowing and sets up a magnetic field, it doesn’t like to stop. Imagine a DC voltage – all the electrons are moving in the same direction all the time. They are happy and have no complaints. When it comes to AC signals, though, that flow of electrons has to change directions. With a 20 k Hz signal, the change of directions happens 20,000 times a second. Electrons are lazy – they like to keep doing what they were doing. Because of this, they oppose a change of direction.

An inductor is truly nothing more than a coil of wire. We see inductors in passive crossover networks and the filter stages of Class D amplifiers. When electrons are flowing through an inductor, they set up a strong magnetic field. When you take away the voltage source, the electrons try to keep flowing. In fact, if you have seen a relay with a diode connected to it, that diode is there to give that flow of electrons somewhere to go, other than back into the circuit that was controlling the function of the relay.

WattsWhen we apply an AC signal to an inductor, the higher the frequency, the harder it is to change the direction of the flow of electrons. The resistance to the flow of alternating current is called inductive reactance. Think of it as resistance, but only applicable to AC signals. Inductors oppose a change in current flow. If we disconnect our alternating current source and measure the DC resistance of an inductor with a multimeter, the number we see on the screen is the resistance. To measure the reactance of an inductor, we need a device that can apply an AC signal and measure the effective voltage drop across the inductor.

The formula to calculate inductive reactance is Xl = 2 x pi x F x L, where F is the frequency of the applied AC signal, L is the inductance value of the inductor measured in henries and Xl is the inductive reactance in ohms. You can see that inductance increases with frequency, as we mentioned earlier.

The voice coil of a speaker is and acts as an inductor.

Current and Voltage

We have more bad news for you. Because an inductor opposes the change in current flow, a timing error arises. Timing of what, you ask? The relative time between the AC voltage across the inductor and the AC value of the current flowing in the inductor. In a perfect inductor (one with no DC resistance), the current through the inductor lags the voltage across the inductor by 90 degrees or ¼ of the frequency of the signal being passed through.

Watts

Let that sink in for a second, then think back to our equations for power. Power is voltage times current. But what if the current peak isn’t happening at the same time as the voltage peak? We can’t simply multiply the two numbers together to get the power in the circuit. Worse, the amount of time that the current lags voltage depends on the DC resistance of the inductor and the inductive reactance – for most car audio speakers, the DC resistance is usually somewhere between 2 and 8 ohms. The inductance is in between 0.04 mH for a high-quality tweeter to more than 5 mH for a big subwoofer.

There’s one more challenge: The inductance changes depending on the drive level of the speaker and the position of the speaker cone.

We’re sure you agree – It’s all very complicated, but don’t give up just yet.

How do we measure the real power in an AC circuit? There are a couple of ways. We can measure instantaneous current and voltage at a very high sampling rate and multiply them together. The sampling rate would have to be 20 or 30 times the frequency we measure to be reasonably accurate. We can also use conventional meters to measure the amount of current and voltage in the circuit, then use a Phase Angle Meter to find the relative relationship between the two. Pretty much none of us have a standalone phase angle meter in our toolboxes. What we can’t do is just multiply voltage and current times each other.

Those SPL Guys And Watts

If you are reading this, then you likely roam the Internet with some frequency. You have undoubtedly seen SPL enthusiasts attempt to measure the power produced by their amplifiers by “clamping”’ it. They connect a current clamp to one of the speaker wires coming out of the amp and put a voltmeter across the terminals of the amplifier.

This creates three problems:

  1. They should connect the voltmeter to the speaker terminals. Because of the high current flow, the resistance in speaker wire can waste a measurable amount of power.
  2. With a voltmeter and current clamp, we don’t know the phase relationship between the current flowing through the voice coils and the voltage across the voice coil.
  3. They typically perform these tests at extremely high power levels. The massive amounts of power heat up the voice coils quickly. This heat also increases their resistance quickly. This increase in resistance will cause the current flowing through the speaker to decrease. If the connected current clamp is in “peak hold” mode, it will store a peak reading of the initial current flowing through the voice coil. The reduction in current flow eases the load on the amplifier power supply and allows it to produce more voltage. As current decreases, the voltage out of the amplifier may increase, giving a false reading to the voltmeter in peak hold mode. This heating and resistance increase can happen in a matter of seconds.

If you thought our definition of the watt was complicated, then explaining how to calculate power in a reactive load would push you over the edge, so we won’t explain it all. That’s a topic saved for college or university courses on AC power. What we will do is provide a solution for making complicated power measurements.

WattsThe reality is when it comes to measuring power out of an amplifier while connected to a speaker, getting accurate results is very difficult. A few companies produce car audio power meters. The most popular unit is the D’Amore Engineering AMM-1. The AMM-1 is a handheld meter that simultaneously measures current and voltage, and calculates the phase angle between them to provide an accurate power measurement. The AMM-1 will show you how much real-world power your amplifier is making. (Please don’t cry if it’s less than you thought.)

The AMM-1 can also show volt-amps. Volt-amps are calculated by multiplying current times the voltage. You can also see the phase angle of the load on yet another screen. If you are serious about measuring power when an amplifier is driving a reactive load like a speaker, then this is the tool you need.

What You Need to Know

When you are shopping for an amplifier, the numbers you usually see quoted are measured into resistive loads. Most amplifiers have no problem with driving reactive loads, so you can trust the published numbers, as long as the distortion specification is clearly defined.

WattsThe CEA-2006A (now called CTA-2006A) specification for power measurement defines the maximum signal distortion during measurement as being 1%, and no more than 14.4 volts can be supplying the amp. Comparing power specs using this standard has leveled the playing field in the car audio industry.

We will look at some other very important amplifier specifications in another article. These other specifications may, in fact, be more important to choosing the right amp for your system than how much power the amp makes. Until then, drop into your local car audio specialist retailer to find out about the latest amplifiers available for your system. There are some amazing new amps on the market with a lot of cool features.

Happy listening!

This article is written and produced by the team at www.BestCarAudio.com. Reproduction or use of any kind is prohibited without the express written permission of 1sixty8 media.

Filed Under: ARTICLES, Car Audio, RESOURCE LIBRARY

Product Spotlight: iDatalink Maestro AR Multi-Amp Upgrades

Maestro AR

Several years ago, iDatalink, the company known for its class-leading remote car starter interfaces, launched an amplifier integration solution called the Maestro AR. The AR (which is short for amplifier replacement) was designed to interpret the CAN bus commands intended for a factory amplifier into something a third-party digital signal processor can understand. While DSP-equipped products from several companies work with the Maestro AR, iDatalink took advantage of a feature in the ARC Audio PRO Series line of processors to develop a unique solution. Multiple AR units can be installed in a single vehicle to control multiple digital signal processors or DSP-equipped amplifiers at the same time. Let’s examine how these upgrades work and why you’d want this solution in your vehicle.

How Does the Maestro AR Work?

In most vehicles with CAN bus-controlled factory-installed amplifiers, the radio’s audio output is a fixed-amplitude (volume) stereo signal. To be clear, the analog audio signal from the source unit, be it the FM radio, Bluetooth streaming or playback of a digital audio file, does not change level with the volume control on the radio. This limitation means that if your installer connects an amp to this signal, it will always be at full volume, no matter where the volume on the radio is set. In some vehicles, there is also a digital audio signal connection between the source unit and the amplifier. The Maestro AR will convert these to an analog signal.

Along with the audio signal coming from the radio are commands that travel along the CAN bus. These commands include volume adjustments, signal routing changes for Bluetooth hands-free calling, warning chimes and tone controls and adjustments to features like bass, midrange and treble tone controls, surround sound modes or speed-compensated volume adjustment. In many vehicles, a second analog signal from the radio caries navigation prompts and hands-free Bluetooth call audio.

The digital signal processor in the factory-installed amplifier routes the stereo audio signal to the various speakers in the vehicle after applying whatever filtering, equalization or up-mixing the manufacturer requested. The Maestro AR interprets commands on the CAN bus network and feeds them to the third-party DSP to ensure that warning prompts and Bluetooth signals are mixed into the system and routed as needed. Finally, and most importantly, the digital messages on the CAN bus control the output level of the third-party DSP in the amplifier to act as the master volume control.

Maestro AR
The radio in the dash of many vehicles sends digital commands to a DSP-equipped amplifier to process the stereo audio signal.

In the above diagram, you can see three connections from the source unit to the amplifier. Those are the fixed-level audio, the analog Bluetooth/prompt signal and the CAN network connection.

In a vehicle that uses the Maestro AR, those control commands go to a third-party DSP from companies like ARC Audio, Audison or Rockford Fosgate. These processors can then replicate the majority of the functions of the DSP in the factory amplifier to give you complete control over your audio system.

In a typical upgrade, your installer would program the Maestro AR interface for your vehicle’s year, make, model and trim level, then connect it to the wiring in the car with a T-harness that’s also available from iDatalink. All third-party partner DSP companies require the technician working on your vehicle to install a brand-specific adapter harness to work with the Maestro T-harness.

For this article, we’ll talk about an upgrade that uses ARC Audio DSP-equipped amplifiers. This ARC Audio DSP installation requires an input adapter harness called the IDATA-OEM, which would be available from your ARC Audio retailer. The IDATA-OEM harness connects to the iDatalink T-harness and the analog RCA inputs on any ARC Audio amplifier or DSP that uses the PS8-Pro platform (PS8 Pro, IPS8.8, PS8-50, Blackbird or PSM Pro). The T-harness includes speaker wires that your installer would connect to the output of the new amplifier to make it easy to feed audio signals to the speakers. Finally, your installer would configure the DSP’s output channel assignments (front left, front right, rear left, rear right, center and subwoofer), crossovers, equalization and, if applicable, delays for each speaker to make the new system sound great.

Maestro AR
An example of an audio system that includes a Maestro-AR compatible DSP-equipped amplifier.

ARC Audio Multiple Amplifier Systems

Many years ago, ARC Audio added a feature to its PS8-Pro and newer digital signal processors that allows several processors to be connected simultaneously to a computer via unique and individualized electronic product IDs for every signal processor made. The installer can label each processor, and the technician setting up the system can select which processor (or DSP-equipped amplifier) they want to adjust from a pull-down menu. While the product development team at ARC Audio was working with iDatalink on Maestro compatibility, the two companies realized they could use this feature to allow multiple AR modules to work together simultaneously to control multiple stand-alone DSPs or DSP-equipped amplifiers.

Maestro AR
The PS8-Pro and new DNA software allow your installer to connect to multiple DSPs simultaneously.

Why would someone want multiple amplifiers in their car’s audio system? We’ll use the example of Fred Lynch’s Ford Flex. Fred works at ARC Audio, and one of his many duties is to oversee international sales. He recently drove his Flex from Modesto, California, to Toronto to be displayed and auditioned at the CMA Expo in March 2023. The audio system in the Ford Flex has three ARC Audio Blackbird 12-channel DSP amplifiers and an additional ARC 1000.2 amp that powers a trio of A-Series shallow-mount subwoofers. In addition, three Maestro AR processors in the vehicle individually control each of the system’s three DSPs.

Fred built the sound system in his Flex to demonstrate the capabilities of ARC Audio’s amplifiers, processors, speakers and subwoofers in an OEM application with all OEM controls and features retained. Most importantly to his family, no storage space was lost. As such, he optimized the system with as much power as possible. He’s also upgraded the vehicle with a three-way front stage with 8-inch woofers in the doors and RS-3.0 3-inch midrange speakers, and RS 1.0 tweeters in the A-pillars. He also bi-amped the rear ARC-Series, coaxial speakers in the mid doors and rear D-Pillar speakers! The center channel midrange and tweeter are also filtered actively. A pair of preamp DSP outputs on one of the Blackbird amplifiers provides the signal to the ARC 1000.2 subwoofer amplifier.

Bonus Features of Maestro Integration

We mentioned earlier that the AR interface sends more than just volume control commands from the factory radio to the amplifiers or signal processors. The ARC Audio DNA software allows your installer to set up a dedicated equalizer band that works with the midrange control and a high-shelf filter that responds to the treble tone controls on the radio. The bass EQ control on the radio can be configured to adjust a single-band EQ, a shelf filter or the remote level control for the subwoofer output.

Finally, the Surround Mode control on the factory radio allows for selecting from several DSP configuration presets. It’s worth noting that the number of presets is limited by the interface on each vehicle’s radio. In Fred’s Flex, he has a configuration with just the front-stage speakers only. The second preset adds the subwoofers. The third preset adds the side and rear speakers. This third preset configuration added space and size to the experience without degrading the tightly focused front stage. The fourth preset changes from a sound-quality-oriented configuration to something more popular with enthusiasts who like a lot of bass by raising several crossover points so the system can safely use the amplifiers’ prodigious power. Toggling the “speed-compensated volume” selection from off to Low to Medium or High switches the presets on all three amplifier DSPs simultaneously.

Another unique feature of the Maestro AR system when using the ARC Audio Pro-Series DSP-equipped product is that installers can reconfigure the volume structure and incremental step level on the factory volume knob. For example, many factory-installed audio systems have issues where the volume control’s first step results in sound that can be too loud to converse with the person in the seat next to you. Another common problem is that the system reaches its maximum output capabilities using half of the volume steps on the factory radio. With AR and an ARC Audio processor, your installer can redefine the volume steps so the volume control works like a factory system with the range and incremental steps you expect.

Maestro AR
Commands from the midrange and treble controls on the factory-installed radio adjust the midrange and treble tone controls as configured by the ARC Audio DNA software.
Maestro AR
ARC Audio’s DNA software allows your installer to set minimum and maximum volume levels to ensure that the system doesn’t distort.

Why Use the Maestro AR?

Any audio system upgrade ideally aims to deliver improved sound quality, extended frequency response and output capability while maintaining the system’s ease of use. Upgrading the system with better speakers, subwoofers, high-power amplifiers and client-specific system calibration while retaining the intuitive control and appearance of the factory radio using the iDatalink Maestro AR ensures that the results are going to be predictable and reliable. Furthermore, this solution eliminates the need for the installer to attempt to recombine filtered, equalized and delayed signals; worry about Bluetooth hands-free calling echoes; or add an external volume control. In short, everything works intuitively and sounds excellent.

So if you have a Ford, Chrysler, Dodge, Jeep, Ram, Toyota, Lexus, Subaru, Volkswagen or Mitsubishi, or a Harley-Davidson motorcycle, visit a local authorized vehicle iDatalink Maestro Retailer and ask about an audio system upgrade that uses the iDatalink Maestro AR interface. As a bit of teaser, we have it on good authority that iDatalink is working on an interface solution for vehicles that use A2B communication, digital over the copper (as is found in many Hyundai and Kia vehicles), along with MOST 50- and MOST 125-equipped vehicles. With the Maestro AR solutions, owners of these vehicles will be able to upgrade the sound systems with premium signal processing, amplification and speakers, ensuring that music enthusiasts can continue to have audio systems that are enjoyable and easy to use.

This article is written and produced by the team at www.BestCarAudio.com. Reproduction or use of any kind is prohibited without the express written permission of 1sixty8 media.

Filed Under: ARTICLES, Car Audio, PRODUCTS, RESOURCE LIBRARY Tagged With: ARC Audio, iDatalink

What To Look For When Buying Marine Audio Products

Marine AudioIf you own a boat, you know how great it is to hang out on it with your friends in the evenings and on weekends. Enjoying great conversation, good food and awesome music is the perfect recipe for fun and relaxation. When it comes to designing and installing a marine audio system on a boat, there are some specific product requirements that will help ensure it lasts for years and always sounds great. Let’s take a look at a few.

Water Damage

Marine AudioImagine the cockpit of a bow-rider or wakeboard boat. If you were to install a conventional car audio CD player in the dash and get it wet, it would stop working. Maybe not right away, but all the exposed internal components that are not protected against corrosion will fail eventually. The same goes for speakers. Car audio speakers can handle a few drops of water now and then, but being rained on or splashed a lot will do them in.

Water-resistant source units are built with control panels that seal themselves when closed. They include rubber gaskets to ensure water won’t get into the back of the radio, and the buttons and controls can withstand whatever Mother Nature throws their way. Look for an Ingress Protection (IP) rating of IP66 or higher. The first number in the rating describes the dust protection capabilities, and the second describes moisture protection. An IP rating of 66 means it is fully protected against dust and against water being sprayed by high-power jets. Specifically, level 6 jets spray 100 liters (26.4 gallons) of water per minute at a pressure of 100 kPA (14.5 psi), at a distance of 3 meters (9.85 feet) for a total of 3 minutes. No water can get into the device during the test.

While direct exposure to water is a problem, so is exposure to dampness and humidity. Thankfully, companies that design source units designed for a marine application coat their circuit boards with a non-conductive water resistant coating. This is referred to as conformal coating. It prevents moisture from corroding component connections inside the radio.

Marine Audio
Thanks to Prestige Car Audio And Marine for sharing this picture with us.

A genuine marine speaker is designed in the same way. These speakers include a rubber gasket on the mounting surface to seal them to the boat. For a coaxial speaker, there must be a secondary gasket at the base of the woofer cone to prevent water from getting into the speaker’s motor assembly. Without this seal, the top plate and T-yoke of the speaker will corrode. Good-quality marine speakers often include drainage channels to let water out from the behind the grille and include provisions for allowing wiring to be secured to the speaker. This prevents speaker wires from being pulled off when objects like life jackets or fishing rods are being pulled out of storage lockers.

UV Exposure

The second challenge is the sun. Almost every boat sits outside in the hot sun all summer. The sun will dry out plastics and fiberglass resins that are not designed specifically to handle harsh UV rays. The materials can fade, turn yellow, crack, turn chalky or simply dissolve. The UV rays cause the microscopic carbon bonds within the plastics to fail at an atomic level, causing free radicals. Once these free radicals (which are highly reactive molecules) are exposed to oxygen in the air, the material starts to fail. Quality marine audio products are made from plastics like Centrex 814 and similar materials that are designed to withstand UV exposure.

Marine manufacturers often specific industry-standard testing procedures such as ASTM D4329. This test puts products in intense UV exposure situations to verify material stability.

Ignition Protection

Marine AudioThe American Boat and Yacht Council (ABYC) has a set of guidelines for the installation of electrical and electronic equipment on boats. While the ABYC guidelines are written for boat manufacturers, they are good practice for anyone who works on boats. Of interest to the installation of marine audio products is the requirement to use of ignition-protected equipment.

Ignition protection-rated devices were designed for use in environments where there are fuel vapors, such as the engine compartment of your boat. In these applications, the devices cannot produce any spark or another form of ignition of flammable substances during normal operation. Manufacturers of compliant products have their products tested in a chamber filled with a flammable air/fuel mixture. The device is operated and cycled through its functions repeatedly to ensure that it is safe. The best part of the test is the conclusion: To confirm the validity of the test, a spark is created inside the test chamber to ignite the fuel. Yes, they blow up the product under test. I know – cool, eh? Devices such as remote controls and circuit overload protection devices (fuses, circuit breakers, etc.) should be ignition protected. Why risk the alternative?

Connectivity

Marine source unit manufacturers put a great deal of effort into their source unit accessories, from simple wired remote controls to units with color LCD displays and wireless units. There are hand-held Infrared and Radio Frequency Remotes, remotes with extra features and outputs to control other functions on your boat (hatch covers, lights, etc.), and even remotes that will let you use your iPod or iPhone to control your radio and see what is playing. These features are not typically found on common “car audio” units.

Salt Exposure

Marine AudioIf your boat is going to be operated near saltwater, fear not. Marine entertainment product manufacturers test for reliability under extremely salty conditions as well. In fact, most manufacturers of marine audio products do extensive salt spray and thermal testing, along with the UV and water ingress tests. Look for ASTM B117 Salt Fog Exposure testing on the products you are interested in using.

It’s no secret that marine audio products cost a little more than similar car audio products. You are making an investment in their reliability. The last thing you want is to sail out on the first day of a long weekend and have your system not work. With quality marine audio products on board and a professional installation, you will always be entertained.

This article is written and produced by the team at www.BestCarAudio.com. Reproduction or use of any kind is prohibited without the express written permission of 1sixty8 media.

Filed Under: Marine Audio, RESOURCE LIBRARY

Sound Deadening: A Great Upgrade For Any Vehicle

Sound DeadeningIf you have purchased a set of premium car audio speakers from a respected mobile electronics retailer in the past few years, then you should be familiar with the concept of sound deadening. If you aren’t familiar with this, or want to know more, then read on! We think you will find sound deadening is an often-overlooked upgrade that has more benefits than most people are aware of.

What Is Sound Deadening?

Automobile manufacturers apply small sheets of dense asphalt or butyl-based material to the floor, firewall or door panels of their vehicles. This damping material adds mass to the panel, making it more difficult for sound and vibration to move the panel and transfer sound into the interior of the vehicle. Automakers walk a fine line between adding weight to a vehicle to reduce noise versus losing fuel economy and handling characteristics due to this added mass. For this reason, most don’t go overboard with sound deadening. They are missing out on a great opportunity.

In spite of what they say in their marketing materials, manufacturers don’t really put that much emphasis on their audio systems. Even when vehicles include multichannel systems with well-recognised namebrands like Bose, Lexicon or JBL, little effort is put into maximizing the performance of the speakers. Proper application of sound deadening can have a dramatic effect on the performance of an audio system.

Aftermarket Deadening Materials

One of the first companies to actively promote sound deadening was Dynamat. Dozens have since followed suit with different approaches to controlling noise inside the vehicle. All of them work on the same principle of absorbing sound energy in one fashion or another and preventing it from being transferred to the interior of the vehicle. Sound deadening has two main benefits when it comes to car audio – exterior noise blocking and audio system performance improvement by preventing backwave cancellation.

Shop At Ralph's
Photo courtesy of Tip Top Customs

When you look at the inside metal skin of a car or truck door, you can see that there are openings to allow access to power window motors, door handles and other components in the door cavity. These openings are typically covered with a thin sheet of plastic. The purpose of the plastic is to keep water away from the interior door panel. That’s important, of course, but these openings work against your efforts to get good sound from your new speakers. There is just as much sound energy being produced from the rear of the speaker as there is from the front. If this rearward-facing sound is allowed to mix with the sound coming from the front, they cancel each other. The result is poor bass and midbass response. Sealing up these openings with a layer of sound deadening means the energy being produced by the rear of the speaker cannot mix with the frontal energy.

Just how dramatic can this cancellation affect be? We have seen instrumented measurements of a factory 6×9” speaker where the difference between having sound deadening or not produced an increase in output of up to 8 dB at several frequencies between 100 and 500 Hz. If you think about how much additional amplifier power it would take to produce the same increase in output, that’s more than six times are much. To be clearer, if you put 10 watts of power into the speaker and measured the response, you would need 63 watts of power into the same speaker to get the same output without the sound deadening. As you can see, that’s a significant difference, and the benefit is not just in efficiency, but in improved low frequency output. The speaker doesn’t have to work as hard, and that alone will improve the overall sound of your system.

It is well worth noting that an upgrade in speaker quality will not produce the same improvement in performance. With a properly sealed and damped door, an inexpensive speaker can easily outperform speakers costing five to 10 times as much money. Sound deadening is critical to the performance of an audio system.

Signal To Noise

Sound DeadeningThe second benefit of sound deadening is in keeping the interior of the vehicle quiet. When you make the interior quieter, the benefit is two-fold. Driving is more comfortable, since you hear less road, wind and tire noise. This reduction in noise also makes it easier to hear your audio system. You don’t have to turn it up quite as loud to drown out the remaining noise. You can hear the quiet parts of your music more easily. Your Bluetooth hands-free system will also sound better. In the same way that controlling backwave cancellation reduces the need for a speaker to work hard, having a quieter interior does the same.

Kinds Of Deadening

Sound DeadeningThere are many different kinds of sound deadening. The most popular are butyl sheets bonded to a thin aluminum layer. The combination works well to span large openings, but is thin and flexible enough to adhere to complex shapes. Other materials are made of vinyl and asphalt-based.

There are three key considerations when looking at different sound deadening products: How flexible is it? How thick is it? How well does it stay adhered once installed? On the engineering and development side, testing the damping characteristics at different temperatures can show quite varied results. Some materials don’t work as well in high or low temperatures. We have seen many people attempt to use materials not specifically designed for automotive applications. When the material melts and ends up as a gooey, black mess at the bottom of your door or leaks onto your carpet, the cost to repair the damage can be significant.

There are also several products on the market that add a layer of foam to the top of the aluminum layer. This foam is great when used between the inside door skin and the metal door because it eliminates buzzes and rattles.

See Your Specialist Car Audio Retailer To Learn More

The next time you are driving by a specialist car audio retailer, drop in and ask about sound deadening. Many people have chosen to apply sound deadening to otherwise stock vehicles. We guarantee the difference in performance from the audio system, combined with the increased comfort while driving, will be well worth the investment.

This article is written and produced by the team at www.BestCarAudio.com. Reproduction or use of any kind is prohibited without the express written permission of 1sixty8 media.

Filed Under: ARTICLES, Car Audio, RESOURCE LIBRARY

  • « Previous Page
  • 1
  • …
  • 10
  • 11
  • 12
  • 13
  • 14
  • Next Page »

Recent Articles

Compustar Pro 2WG18 LTE

Product Spotlight: Compustar Pro 2WG18 LTE

July 7, 2025 

At their heart, most remote car starters are the same. When you press a button on a wireless remote, a remote start controller integrated into the vehicle will start the engine. In … [Read More...]

Acoustic Suspension Subwoofer Enclosures Explained

Acoustic Suspension Subwoofer Enclosures Explained

July 6, 2025 

Enclosure, box or cabinet: Whatever you want to call them, where you install your speaker or subwoofer is critically important to their resulting performance. In this article, we … [Read More...]

Wiring

The Importance of Proper Cables and Wiring

June 1, 2025 

Installing mobile electronics systems is not as easy as it used to be. In the “good old days,” cars were made from thick metal and didn’t have many electrical components. Modern … [Read More...]

DroneMobile XC Connected Dashcam Security System

Product Spotlight: DroneMobile XC Connected Dashcam Security System

May 26, 2025 

Thieves frequently target vehicles from Hyundai, Kia, Toyota, Lexus, RAM, Chevrolet, and Honda. These vehicles are often stolen for their parts or exported overseas. … [Read More...]

Compustar 2WG17 Remote Kit

Product Spotlight: Compustar 2WG17 Remote Kit

May 19, 2025 

Compustar was one of the first brands to allow consumers to choose a remote control package to accompany their remote start controller. Previously, we looked at flagship-level … [Read More...]

Subscribe!

Enter your email address to subscribe to our website and receive notifications of new posts by email.

Join 3 other subscribers

Testimonials

Nice staff and honor their work

Audio Crew did some work for me about 2yrs ago. A speaker they installed wasn't working properly. They checked it out and problem was a corroded wire. They fixed the problem and told me no charge for the repair. Very nice of them to do that as problem wasn't their fault in the first place. Audio Crew have a nice staff and honor their work.

VERY HONEST and PROFESSIONAL company

I purchased a 2019 used car for my wife and she wanted a remote started installed. I went to Audio Crew, who I had dealt with before, got a price and made an appointment. We dropped the car off the night before, for the appointment with a request that they call us when ready. Early the next morning, I received a call telling me that there was good news!! The car already had a remote starter which was programmed into the factory remote. We only need to press the "lock" button three times to star the car!! The dealer who sold us the car was not aware of that, it was a pleasant surprise to us and a $350 savings. THANK YOU to a VERY HONEST and PROFESSIONAL company.

Absolutely the best service

Absolutely the best service you will get anywhere. They go above and beyond! Can’t recommend them more! They fixed our issue quickly. Super friendly and helpful. Will not buy anywhere else.

Great Service

Great service, huge demo room with great prices. Very knowledgeable and professional service from the owner and will work within your budget to help you achieve your goals in the sound system your looking for. Extremely great experience dealing with them, also pricing was excellent competitive prices.

Subscribe to Our Website

Enter your email address to subscribe to our website and receive notifications of new posts by email.

Location


Get Directions to Audio Crew

Address

Audio Crew
624 Salisbury Rd
Moncton, NB E1E 1B8
Phone: 506-858-2739

Connect With Us

  • Facebook
  • Instagram

Services

  • Car Audio
  • Marine Audio
  • Motorcycle Audio
  • Remote Starters
  • UTV and Side-by-Side Upgrades

Store Hours

SundayClosed
Monday8:30 AM - 5:00 PM
Tuesday8:30 AM - 5:00 PM
Wednesday8:30 AM - 5:00 PM
Thursday8:30 AM - 5:00 PM
Friday8:30 AM - 5:00 PM
SaturdayClosed

Copyright © 2025 Audio Crew · Privacy Policy · Website by 1sixty8 media · Log in


Loading Comments...